2Open Workspace (/notes) and click Create note, or go directly to /notes/create.
3Add a title, write the body in the rich-text editor, optionally add tags, pick a snippet language, and paste code.
4Save your note appears on the workspace dashboard and in the full library at /notes/all.
What is Code Notebook?
Code Notebook is a developer notebook for capturing how you solved something: a title, a rich-text explanation, optional tags, and an optional code snippet with syntax highlighting.
Everything is private to your account. Notes sync to the cloud so your library is available whenever you sign back in.
Every note has four main parts: title, rich-text body, optional tags, and an optional code snippet with a language.
Create and edit use the same layout: note details and body at the top, code snippet in the middle, and an AI Explanation section below after you click Explain.
Pro tips
Use the title for how you'd search later e.g. "JWT verify helper" or "Postgres index tip".
Put the why in the body and the how in the code snippet.
Tags are short labels like react, sql, or interview.
Rich-text body
The content field supports headings, bullet and numbered lists, links, tables, and inline code. Use it for steps, context, links to docs, or interview takeaways.
Code snippet
Pick from 35+ languages in a grouped dropdown Essentials, Systems & backend, Data & APIs, Web, DevOps, and more.
Every snippet panel includes a Copy button that puts the code on your clipboard and shows "Copied!" for two seconds.
Pro tips
The language picker sets syntax highlighting for your snippet.
Leave the snippet empty if the note is prose-only.
Click Explain in the snippet toolbar to get an AI walkthrough of the code (signed-in users).
Tags
Add tags when creating or editing a note press Enter or comma after each one. Click × on a badge to remove a tag before saving.
Tags appear as badges on your note cards in the library.
Filter by tag
When your notes have tags, a filter bar appears below search with an All chip and one chip per unique tag.
Click a tag to show only matching notes; click again or choose All to clear the filter.
Search
Smart search across all your notes title, body, snippet code, and tags.
Results update as you type. Clear the field or use the × button to reset. Pagination resets when the query changes.
Pro tips
Search inside snippet code useful when you remember a function name but not the note title.
Combine search with a tag filter to narrow a large library quickly.
Card actions
Each note card has a menu with View, Edit, and Delete options.
Opening a note
Note view shows your formatted body text and code snippet in read-only mode, plus the created date and language badge.
Use Edit note to jump back to editing or Library to return to the grid.
Power features
AI explain, copy flows, public links, and keyboard navigation.
AI explain
Every snippet panel on create, edit, and read view includes an Explain button in the toolbar (next to Copy). It streams a plain-English explanation powered by AI.
Output appears in the AI Explanation section below the code two short paragraphs plus a Worth knowing list. Code terms render as purple inline chips (e.g. useMemo, flatMap).
On read view and edit, explanations are saved to the note when streaming finishes. They reload automatically next time you open the note. Use Clear to remove and save an empty explanation.
On create, explanations are temporary until you save the note open the saved note and click Explain again to keep it.
You can run up to 10 explain requests per hour while signed in. 10 requests per hour on the free plan — see Pricing for upcoming Pro limits.
Pro tips
Works best on focused snippets keep the panel to the code you want explained.
Click Explain again to regenerate; on read/edit this overwrites the saved explanation.
The AI explanation always appears below your code snippet.
Public share pages do not show Explain or saved AI explanations viewers see title, body, and snippet only.
Copy raw code
The Copy button on every snippet panel writes the raw snippet text to your clipboard. It works on create, edit, and read views.
Copy screenshot
On read view only, Copy screenshot captures a syntax-highlighted PNG of the code currently visible in the editor — scroll to the lines you want, then capture. Useful for Slack, Notion, or tickets where you want colors preserved.
If clipboard image paste is unavailable in your browser, the capture may download instead.
Public shareable links
In create or edit, enable Make this note public to publish a read-only URL at /notes/[id]/public no sign-in required for viewers.
When public is on, use Copy link to grab the URL. Turn it off anytime to revoke access; the link stops working immediately.
Pro tips
Public pages show title, body, and snippet only no edit controls or AI explain.
Use for blog posts, PR descriptions, or sharing a solve with teammates who don't have an account.
Command palette (Cmd+K)
When signed in, press Cmd+K (Mac) or Ctrl+K (Windows/Linux) anywhere in the app to open the command palette.
Search notes by title and tags, or run actions: New note, Open workspace, Open library.
Pro tips
Notes are sorted by most recently updated.
Arrow keys to navigate, Enter to open, Esc to close.
VS Code extension
Install, authenticate, and save snippets from the editor.
Install the extension
Install Code Notebook from the VS Code Marketplace first then connect it with an API key from the web app.
1Open VS Code and click Extensions in the left sidebar (or press Ctrl+Shift+X on Windows/Linux, Cmd+Shift+X on Mac).
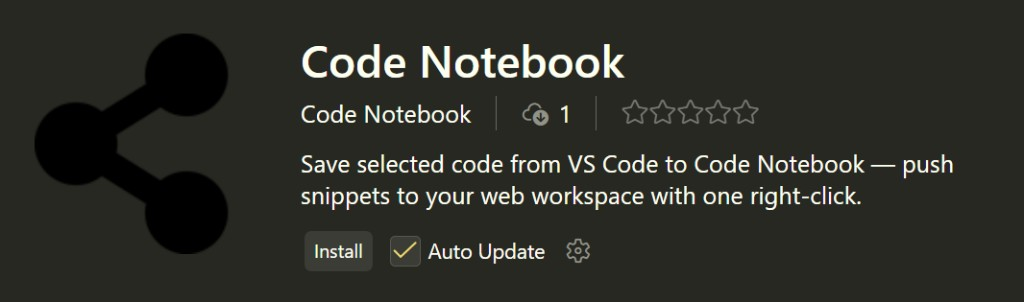
2Search for Code Notebook. Pick the extension published by Code Notebook — it should match the screenshot below.
Look for Code Notebook by publisher Code Notebook then click Install.
3Click Install and wait until it finishes. You can leave Auto Update on.
API key setup
The extension uses an API key not your browser sign-in. Create a key in the web app, then paste it into VS Code.
1Sign in to Code Notebook in your browser. Open Settings from the avatar menu (top right) or the Settings link in the navbar.
2Under API keys, click Create key and give it a name you'll recognize (e.g. VS Code laptop).
3Copy the key immediately — it is only shown once. Keep it handy for the next step.
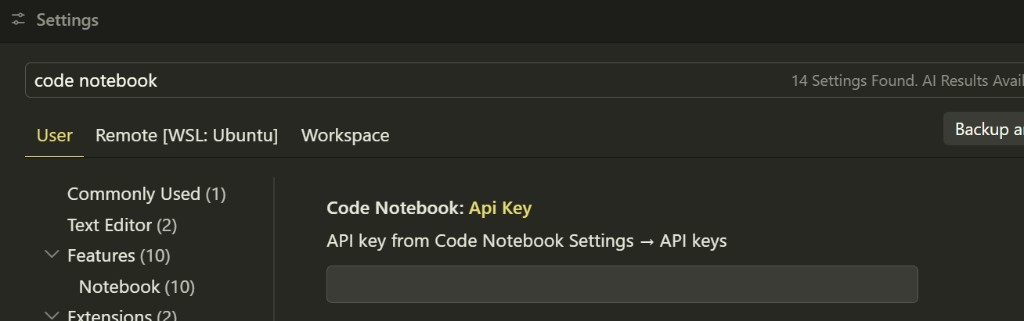
4In VS Code, press Ctrl+Shift+P / Cmd+Shift+P, type Open Settings, and select Preferences: Open Settings (UI). Search code notebook and paste your key into Code Notebook: Api Key — see the screenshot below.
Search code notebook in VS Code Settings → paste your key in Code Notebook: Api Key.
5Select code in a file, right-click → Save to Code Notebook, enter a title, and check that the note appears in your workspace.
Pro tips
Revoke keys anytime from Settings → API keys → Delete.
If saving fails, check your key is correct or create a new one in Settings.
Code Notebook is on the VS Code Marketplace, but Cursor and editors like VSCodium use a separate extension catalog — the extension does not appear in their search.
Download the .vsix from the Extension download page and follow the install steps there. The same API key from Settings works once the extension is installed.
In Cursor, open VS Code Settings via Ctrl+Shift+P / Cmd+Shift+P → Open VS Code Settings, or via gear icon → Settings → VS Code Settings. Search code notebook there to paste your API key.
Pro tips
Use the Marketplace on VS Code when you can — you get one-click install and automatic updates.
VSCodium and other VS Code forks use the same .vsix sideload flow as Cursor.
Sign in or sign up from the navbar to access your workspace and manage notes in the web app.
Notes are private to your account by default.
API keys (Settings)
Settings lets signed-in users create, list, and revoke API keys for the VS Code extension.
Each key has a label and creation date. The full key is shown only once when you create it copy it to your password manager or VS Code settings right away.
1Sign in and open Settings from the navbar or avatar menu.
2Enter a name and click Create key.
3Copy the key when shown you cannot view it again.
4Paste the key into the Code Notebook extension settings in VS Code (gear icon → Settings). For Cursor and other editors, see the Extension download page (/downloads).
5Delete a key anytime to revoke it create a new one if you need to reconnect.
Yes. Leave the code snippet empty and use title, body, and tags only.
Are my notes public?
No notes are private by default. Enable Make this note public when creating or editing a note to share a read-only link; turn it off anytime to revoke access.
How does AI explain work?
Click Explain on any snippet panel. It streams a plain-English summary into the AI Explanation section below the code. On read and edit views, the result is saved to the note; on create it is temporary until you save the note.
Is there a keyboard shortcut for navigation?
Yes. Press Cmd+K or Ctrl+K when signed in to open the command palette search notes or jump to workspace, library, or create.
Can I use the extension in Cursor?
Yes. Code Notebook is not listed in Cursor's extension search — download the .vsix and follow the step-by-step guide on the Extension download page (/downloads).
How do I connect VS Code?
Open VS Code → Extensions (Ctrl+Shift+X on Windows/Linux, Cmd+Shift+X on Mac) and search Code Notebook. Install the extension published by Code Notebook.
Sign in to Code Notebook in your browser. Open Settings from the avatar menu or navbar → API keys → Create key. Copy the key immediately — it is only shown once.
In VS Code, press Ctrl+Shift+P / Cmd+Shift+P, type Open Settings, and select Preferences: Open Settings (UI). Search code notebook and paste your key into Code Notebook: Api Key.
Select code in a file, right-click → Save to Code Notebook, enter a title, and check that the note appears in your workspace.
I lost my API key can I view it again?
No. Keys are shown only once when you create them. Revoke the old key in Settings and create a new one.
What happens if I delete a note?
Delete is permanent after confirmation.
Why don't I see the tag filter bar?
The filter bar appears once at least one note in your library has tags.
Is everything free?
Yes — the full product is free today. Pro and Team tiers with higher limits, export, and team workspaces are on the roadmap. See the pricing page for what's coming.
Ready to capture how you solved it?
Free to start rich text, code snippets, tags, search, and copy in one workspace.